All Posts by ‘ShootingDave

Post

Moving postcards

Leave a reply


Previously on this blog I had a “Postcards from…” series which I will admit, I haven’t really kept on top of. However I have been travelling around just as much as before. Rather than just supply stills from each trip, I have been trying to find my feet when it comes to video. Below are a few videos from recent trips I have been on in 2018:

Amsterdam: this was a small weekend away with some of my closest friends for my stag-do. I had shot most of this on my iphone with a DJI Osmo Mobile 2

Barcelona: Amy and I got married in May and we went on a mini-moon to Barcelona to enjoy all that Spain has to offer. Most of the footage from this was with my iphone with the DJI Osmo Mobile 2 and GoPro footage.

Gatebil: This was the big one, the trip I have most been looking forward to. I have shot this event numerous times in the past and I finally wanted to share with you what it is like. GoPro and Canon 5D Mk3 for this one.

What do you prefer? Do you prefer the standard postcard format or do you like the videos more? Or what about both? Let me know below.

Don’t for get to follow me on instagram too.

SHOOTINGDAVE

Post

Why YOU should print your images

Leave a reply

At the risk of sounding like an antiquated old man (I’m 32), the digital age is a marvelous thing, it allows you to take photos and see them instantly, quickly share them and broaden your audience. It the same vein, it is also a bad thing, attention spans are somewhat limited to a few seconds before happily swiping on. Images you have poured your heart into are rarely given the attention they really need. And this is fine for the most part, not every photo requires your full undivided attention.

BUT, when you have an image you really love, or one that is close to your heart for some reason, don’t let it remain forever on your hard drive or your phone. Get those images printed and up on your wall.

You may remember from an earlier blog post that I had hard drive failure and lost a tonne of photos. I won’t go into it again, you can read the post if you want to know more. But it sucked. Anyway, I’d been wanting to print my images for a long time and this was a major driving force behind getting it done. Check out my video on my thoughts below.

SHOOTINGDAVE

Post

Dipping my toe

Leave a reply

Funny isn’t it? I never expected to make the jump into YouTube and yet, here we are.

After writing my last post on Light Painting, I found that I really enjoyed sharing what little knowledge I have with you. When I was starting out as a CG artist, I used to write tutorials, and I loved it. This mini, let’s call it an “explanation” of a photographic technique took me back to that.

Words aren’t always the most effective way of showing you how to do something, especially when they are sprawled out in printed form across a screen. Hence the natural jump onto YouTube. And here it is, enjoy…like…comment…subscribe…you know how it goes.

What can you expect from me going forward? Well, to be frank, not much. This is new to me, it requires enormous amounts of conscious thought to do. I have about 9 videos that I would like to make but don’t hold your breath. However you can subscribe to my channel here if you so desire.

If I do finally pull my finger (tripod, microphone, lights and camera) out then there are some areas that I would like to cover. I’d like to show retouching tips and tricks. Different photography techniques including lighting techniques. Possibly gear reviews, this is actually something that I used to do. I may occasionally try and make some travel videos too. But my initial plan was, is to show you what goes on behind the scenes at a shoot and through the editing side of things.

My thinking about this whole thing is that I am currently dipping my toe into it. I don’t want to buy any new gear for it yet but if it does start take off, then I will try and focus more time, money and energy into it.

Let me know what you thought, I’d genuinely love to hear what you have to say.

SHOOTINGDAVE

Post

Light Painting: What is it?

2 comments

What is Light Painting and how do I start?

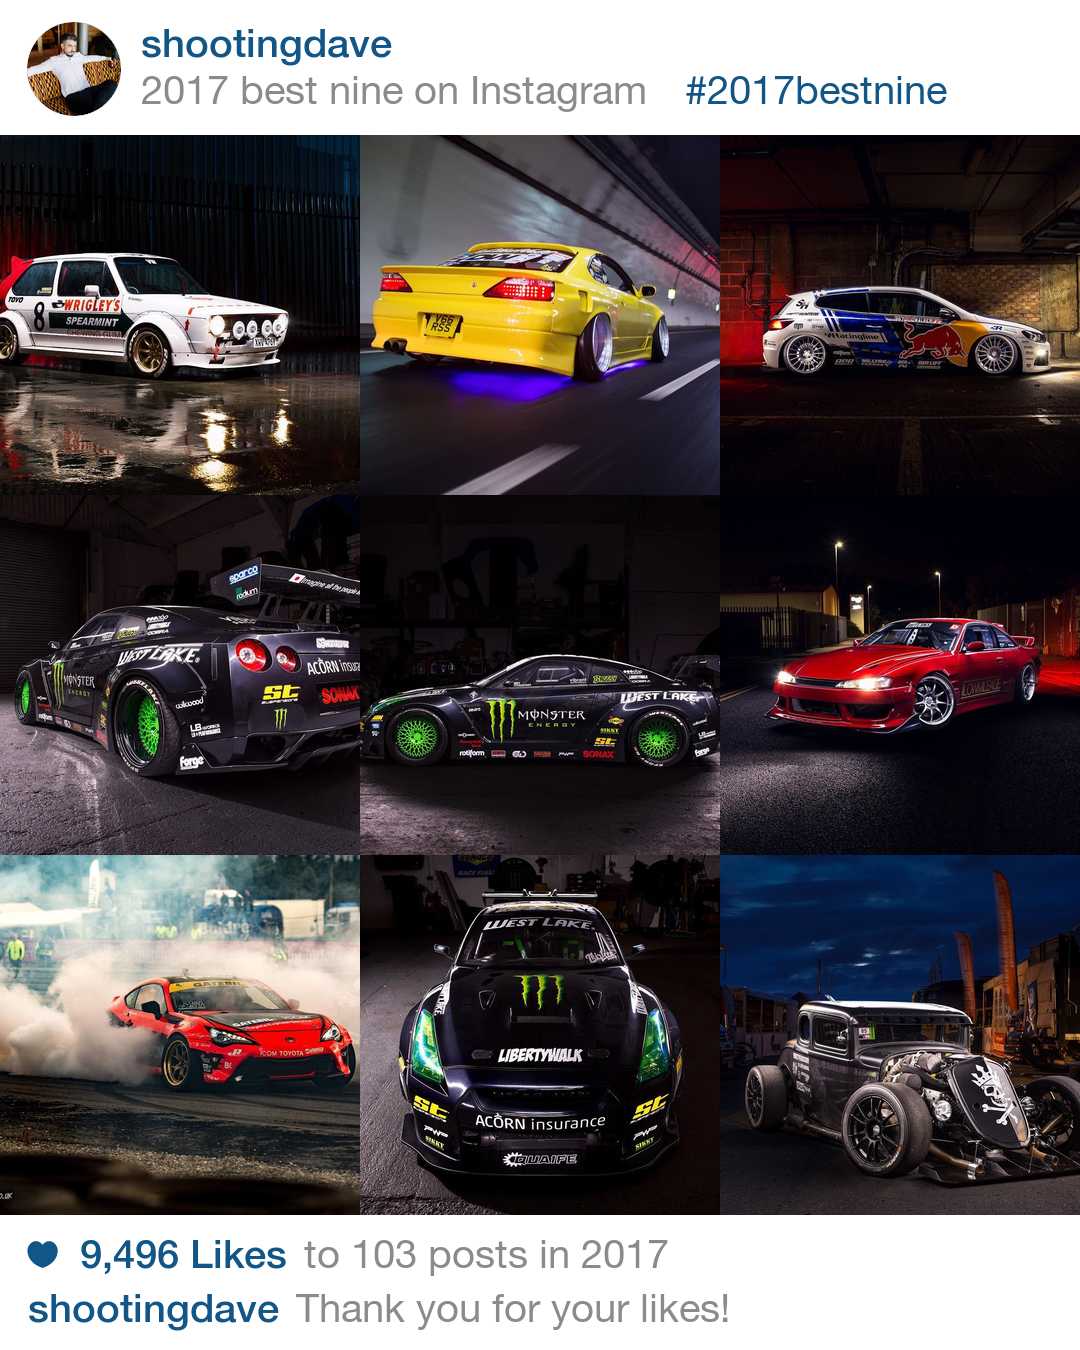
Stay with me here, I will get to that. During the closing of the year, I like to see what my most popular posts were on instagram. (For those of you who are interested, I used http://2017bestnine.com) you can follow me here: @shootingdave

As you can see, 7 out of the 9 most popular images are light painted. Clearly you guys like those style of images. But what is light painting? What do I need to make one myself?

A light painted image is essentially long exposure where you move single light source around the subject (in this instance a car) highlighting the key areas. To get started you will need a basic understanding of photography and exposure, along with some equipment which bring us onto the next topic.

The Gear…

Starting the in the top left corner and working round clockwise I will talk about the gear I use to make light painted images.

1: The Camera

Any will do so long as you can set all of the functions manually. I use a Canon 5DMk3 which you can buy here.  I will get onto lenses later as I feel that is worth talking about separately.

2: Tripod

As you are going to be taking long exposures up to 30 seconds, I recommend you use a sturdy tripod. You don’t want the camera to wobble or shake causing blurry images do you? For years now I have been using Manfortto and their 055XProB has served me well. They have since discontinued it but I would recommend this carbon fibre version of it here.

3: Remote

Why might you want a remote? I try to avoid touching the camera as much as possible. I use the remote to alter the length of exposure and the amount of delay so that I can get into position. If you are a Canon shooter then I cannot recommend this one enough!

4: The Light

Now for the important part, often a closely guarded secret among photographers. I don’t have the budget for the Westcott Ice Light 2 as nice as it might be. So I bought a budget version, I’ve owned for 3 years, flown to 3 countries with it and it has been fine ever since. It is the Magic Tube Light MTL-900 II. A catchy name I will admit. It is branded a number of different ways but works well. It has an orange sleeve which makes the light 3200k and 5500k without. Handy for shooting under street lamps so you have matching colours of light sources.

That is the bare essentials for light painting. However you will need to wait until it is dark.

Lenses…

I wanted to keep this section separate as it is so subjective and location dependant. A great deal of my images are shot on a 35mm lens this one to be specific. I do this so that I can show both the car and the location without distorting the car too much. I have a wider Canon 24mm f/2.8 IS which is great for tight locations all thought it does run the risk of distorting the car. And where space allows it is often nice to use the Canon EF 135mm f/2.0L .

Below are some examples.

24mm

35mm

135mm

The Setup

So now you’ve got the gear, what do you do?

Once you have found your location, you want to wait for dark and get the car into position. Framing up should be no different to any other shoot you do. Find the composition that works for you, looking through the camera to make sure you are happy. Once you have found that sweet spot, grab the tripod and setup the camera.

I set the camera to manual focus and use live view to zoom in and focus. The next thing you are going to want to do is set the camera to bulb mode. You will control the exposure using the remote. If you don’t have a remote, use manual and set your shutter speed accordingly. You want to make sure the shutter speed is long enough for you to walk around the car.

I set the ISO to 100 to make sure the image is clean of sensor noise.  For the aperture, I start at around f/8. All of the car will be in focus and the relatively small aperture should help dial down any ambient light.

I take a test exposure of around 10 seconds to assess the scene. From experience, 10 seconds is long enough for me to move the light source down the side of the car. What you are looking for is minimal ambient light so that you can introduce your own light into the scene. If it is too bright, choose a smaller aperture (f/11 for instance). You could also shorten the exposure time but you will need to make sure it is long enough for you to walk around the car.

Once you have balanced the base exposure it is time to start lighting. Set the camera to a delay or get someone else to fire it for you, get into position, turn the light on and walk down the side of the car. Once the exposure is complete, come back to the camera and review your image.*

Try not to light yourself or point the light at the camera as you will get flaring.**

Once you’re happy with that side of the car, move onto another side. Keep repeating the process until you’re satisfied with what you have captured.

*most cameras allow you to change the image review time. I set mine to “hold” so that the image stays on the back of the camera until I shoot another exposure. This avoids me having to touch the camera and potentially move it.

**also try wearing dark clothing, cameras record light and not dark.

Finishing up

Once you are done with the shoot and you’re back home ready to edit, you will want to blend these images together using Adobe Photoshop or something similar. I think that will have to wait for another guide as it is quite a length process to do.

What did you think of this guide? Was there any areas that you would like to understand more of? I considering filming or time-lapsing a shoot. Would you like to see a speed edit or walkthrough when I get the images into photoshop?

I’d love to hear your feedback.

SHOOTINGDAVE


Post

Upgrades

Leave a reply

Who doesn’t love an upgrade?

For whatever reason you may face, at some point you are likely to upgrade your photography gear. Be it because you obsess about having the latest and greatest gear or because you simply need a tool to do a specific job. The feeling of actually purchasing new equipment is a good one. I am not one to do these things on an impulse. I agonise over the decision to part with hard earned cash for inanimate objects, not matter how fancy they might be. I am going to walk you through some of my latest purchases from earlier this year and the reasons for me acquiring them.

MacBook Pro 13″

For years now I have been wanting to be able to edit photos whilst away from home. In fact ever since I started travelling for photography I have loathed the idea of waiting to get back home and edit. I would sit quietly sipping beer in the hotel whilst my friends sat and edited photos shot that day. I would grow envious and started wishing the rest of the trip away so that I could post a picture. This established enough of a need for me to want to get a laptop. Coupled with the fact that my PC at home really was on it’s last legs.

At the time, I wasn’t bothered what camp I would fall into, PC or Mac, I don’t buy into brand loyalty or fan-boyism. I use PC’s for work, always have. I genuinely couldn’t make up my mind as to which one I wanted so I treated each day as if I was buying a Windows laptop and then next day as if I was buying a MacBook. Flipping a coin if you will.

It was through this small mind game that I eventually made my decision to get a 13″ MacBook Pro though. I just felt excited about owning a MacBook.

I was never really satisfied with the build quality of Windows laptops. They were generally speaking cheaper and I felt that reflected in the build quality. Not much to criticise but considering I will be owning this for a few years, I couldn’t have a squeaking, flexing chassis to work on. As an ex-engineer, this was a big no no for me.

3 years it took me to make up my mind and genuinely couldn’t be happier. I opted to go for the non touch bar and specced up the RAM and CPU to 16Gb and an i7.

Canon 300mm f/4 L IS USM

Until recently, my longest lens was the Canon 135mm f/2 L. Although a stunning lens, it really wasn’t too short for Motorsport photography. I was lucky enough to have some long term reviews of Canon’s 300mm lenses. I did a review for Cafetography on youtube. I simply did not have the budget for the big 300mm f/2.8 L IS USM for realistically I was looking at the 300mm f/4 L IS USM.

Not only did this save a great deal of money but it also saved my back from carrying it around all weekend. This is the lens that I use 90% of the time when at the track. Sure a zoom lens would be more versatile but I have always preferred to shoot with primes. It’s just down to personal preference.

When a good friend mentioned that he was selling his 300mm f/4 L I pretty much snapped off his arm in buying it off of him. 300mm fits nicely into my lens collection (35mm – 50mm – 135mm) giving me enough focal ranges to cover 90% of what I need. The only gap was something wider which brings us on to my next acquisition.

Canon 24mm f/2.8 IS USM

If your memory lasts more than a sentence then there was a weak spot in my current arsenal. I needed a wide angle. I found when shooting a lot of car interiors both for Fueltopia and work that the 35mm wasn’t quite wide enough to get all that I wanted in. I also wanted something that could capture more of the environment and could be used for landscape photography. When I shot the cover image for this article I borrowed my friends Canon 16 – 35 mm f/2.8L III USM lens. A stunning lens, huge versatility and insanely wide at 16mm.

It was just a bit much of a stretch for me. I prefer longer focal lengths and didn’t really fancy dropping a huge amount of money on a lens that I knew I wouldn’t use all that much. The Canon17-40 mm f/4.0 L USM was also considered. Offering much the same in terms of focal range albeit with a slower aperture. I have used the 17-40L many times before but I never really loved it. I didn’t really fancy having a lens that had a maximum aperture of f/4 either as I would often be shooting handheld in low light. Image stabilisation was something that I convinced myself that I needed for some arbitrary reason.

Thoughts moved towards the Canon 24mm f/2.8 IS USM. I began watching second hand sites like a hawk. Pricing was pretty competitive and when one came up for a price that I was happy with, I jumped at it. Oh and it also came with the £50 lens hood which is a bonus.


For now, that is all the gear I need. Well, until I convince myself otherwise.

SHOOTINGDAVE